My cat, Thor, is particularly adventurous and amenable to leash training; not unusual for a Bombay. His first harness, from a pet store, was poorly made and wasn’t satisfying for long. We do a lot of walking around, and he’s got a backyard cat run, so his harness gets a lot of wear and tear (and must be supremely comfortable).

An enthusiastic do-it-yourselfer with a military, emergency medicine, and search-and-rescue background, it seemed destined that the next harness and leash would be handmade (and — because I’m also an lover of extreme overkill engineering — that it would feature best-of-breed parts and construction).
What I describe here is the end-result of many prototypes; many combinations of hardware, cordage, and design were tested before this comfortable, easy-to-construct system was achieved.
Features
- Comfortable over long wear time — we’re frequently out for hours (or days, while camping)
- Rugged, long-lasting, reasonably unbreakable — I don’t want this to break while in use
- Unobtrusive and perhaps fashionable — we both have to be proud of the end-result
- Choke-resistant and weight-bearing — someone is an ardent tree-climber and strangulation is an ever-present threat
My experience with vertical cliff rescue was my primary inspiration; being tied to the mountain via a harness that both supported my weight and allowed me to continue breathing by not compressing my chest when dangling in thin air were features I quite liked. Thor would need some sort of harness that could support him dangling and let him breathe.
Whatever I built, it’d need to have the characteristics of a self-equalizing anchor — “a way of constructing an anchor so that it adjusts to changes in the direction of pull in order to distribute the load equally to the anchor points” (REI). Whether Thor is sitting quietly, running ahead of me, or dangling from a tree limb after a fall, the harness will need to distribute the weight between his fragile neck and torso in a life-preserving and comfortable way.

Materials
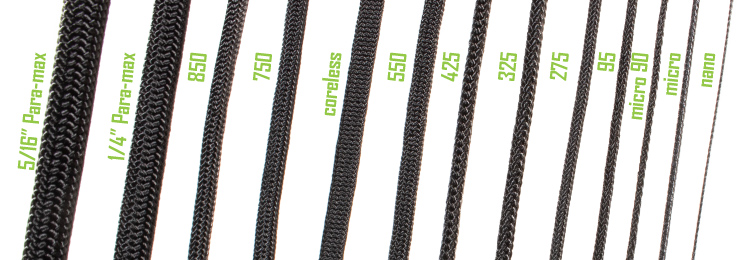
I ask you: what material is inexpensive, easily acquired, simple to work with, painless to repair, both strong and flexible, available in many colors, exceedingly resistant to failure under load, and comfortable against fur while being jostled for long periods of time? Why, I just know that MIL-SPEC MIL-C-5040 Type III paracord (parachute cord) was on your lips! Even my local dollar store sells paracord. Type III because it hits that sweet spot between strength (550 pounds / 250 kilograms of lifting capability) and thickness (paracord types that are too thin requires way too many knots for the same length, which — trust me — takes a lot more time).
For the hardware — the connector between leash and harness, the O-rings, and the buckle — I went with marine-quality choices. These tend to be optimized against failure during sailing, resistant to corrosion, and long-lasting. Planned obsolescence is not desirable here. More details and photos to follow; these items are available online and at hardware stores (and certainly at ship chandleries).
Parts List
- MIL-SPEC MIL-C-5040 Type III paracord — at about 1/8″ wide, this type of paracord requires about 1 foot of cord for every 1 inch of knotted bracelet length. That’s about 12 centimeters of cord for every 1 centimeter of bracelet. Have more than you need on hand because your style of knotting may need more cord and because it’s fun and you’ll be making watchbands, knife fobs, and other paracord projects once you see how rewarding this is.
- 2 1-inch welded stainless steel O-rings, with an inside diameter of 7/8-inch (large enough to have the buckle easily slide through). Stainless steel is harder, stronger, and more corrosion-resistant than brass (although I really liked the look of brass).

- 1 Fastex® 3/4-inch side-release acetal buckles. The durability and longevity of polyoxymethylene buckles versus the flimsy, cheap generic options make the time it takes to find the genuine product well worth the time. The harness integrity depends upon the buckle being able to handle load and the friction of connection hundreds or thousands of times. I’ve learned to harvest these from worn-out backpacks; both Jansport and Camelbak use durable buckles.

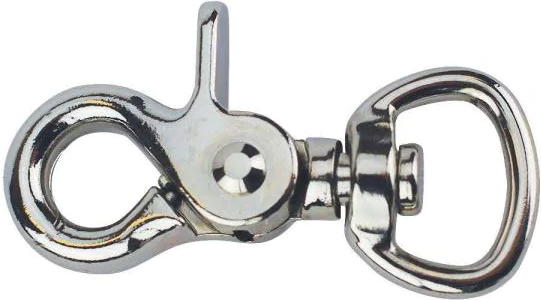
- 1 swivel trigger round eye hook to serve as the connector between leash and harness. My choices were brass or nickle-plated. The swivel is essential to avoiding a tangled leash. This connector gets a lot of use; I opted for a really sturdy one. Swivel eye snap hooks are more common but break quickly and don’t work well with gloves.
Construction
The leash and the harness are made by weaving the paracord with a single cobra stitch. As stormdrane has been showing us ways to use paracord in ways I never imagined since ~2005, it’s a special joy in calling out his paracord survival bracelet with buckle as the foundation for Thor’s rig.
The Harness

The harness is a modified survival bracelet; the instructions above will pave your way. Before you do anything, thought, please note:
- While it’s certainly possible to buy a large spool of paracord and make the leash from one section of cord, you can also buy the 25-foot sections available at dollar stores and fuse the ends together as you go. It won’t look as smooth but it’s just fine.
- Before you start weaving, take a single strand of cord, wrap it in a comfortable figure-8 around your pet, and measure to figure out the harness length. Subtract the length of the buckle. Measure where the cords cross on your pet’s back; that’s where you’ll weave in an O-ring through which the harness will flow (to equalize the front and rear tension). Because this design is a fixed length, without any way to adjust, accuracy will be rewarded.
- I put the buckle on the center of Thor’s chest because I imagined that’d be the most comfortable. Theoretically, there’s no reason the buckle couldn’t be somewhere else on the figure-8, as long as it’s not rubbing on the O-ring. Note that the buckle fits through the O-ring, so buying the correct sizes of ring and buckle is important.
The Leash

The standard leash length seems to be around 6 feet / 2 meters. After a few prototypes, I settled on a length that’s 10 feet / 3 meters with an O-ring woven into the leash about 6 feet / 2 meters from the pet connector. I actually made the leash a bit longer and folded over a section that’s just right for slipping my hand into so that I have a wrist strap.

I keep two medium carabiners on the wrist loop to connect to my belt loop and, when I need a shorter leash, to the O-ring.

The swivel eye connector I picked has a square bottom, which gives a neater look to that end of the leash. Weave near the end of your paracord, secure them around the swivel, and fuse the ends together.

That’s it! The paracord is hardy, resistant to being dragged, and easy to fix when the core gets damaged. This one is over two years old, been on a lot of walks (and airports and airplanes) and shows very little wear.

Because we walk all over our island many neighbors have been asking me, since before the COVID-19 pandemic, to document the “choke-proof” harness and leash I made for Thor, but I’ve just now been inspired to write it all down. I hope it was worth the wait :-) I have made a few of these, in a variety of colors, for local dogs and cats and might be persuaded to do so again…
Would this be an escape proof harness?
In over seven years with this harness design, many hundreds of outdoor hours, Thor has never wriggled out of it. So let’s say it’s reasonably escape-proof.